මේ ලිපියෙන් කතා කරන්න බලාපොරොත්තු වෙන්නේ Laravel එක්ක පොඩි CRUD Application එකක් හදන විදිය ගැන. ඒ කියන්නේ Create, Read, Update, Delete කියන Basic Database Function 4 කරන විදිය ගැන. (https://github.com/Danushka96/laravelcrud)
Laravel Install කරන විදිය Basic Application එකක් හදන විදිය ගැන බැලුවේ නැත්නම් මේ ලිපිය බලන්න
මූලික පියවර
මුලින්ම කරන්න ඕන අලුත් Laravel Project එකක් පටන් ගන්න එක. ඒකට මේ command prompt එකෙන් Application එක හදන්න අවශ්ය තැනට ගිහින් මේ Command එක Paste කරලා Enter කරන්න.
composer create–project –prefer-dist laravel/laravel crudApps
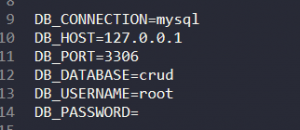
පොඩි වෙලාවකින් අලුත් Project එකක් හැදිලා තියෙයි crudApps නමෙන්. දැන් කරන්න තියෙන් අලුතින් Database එකක් හදා ගන්න එක. ඒකට mysql Server එක on කරලා අලුතින් Database එකක් හදලා ඒකට අදාල Login Details ටික .env file එකේ දාලා Save කරගන්න.
හරි මූලිකම පියවර ඔය ටික හරියට කර ගත්තහම ඉවරයි.
දෙවන පියවර
මේ පියවරේදි අපි කරන්නේ Database එකත් එක්ක සම්බන්ධ වැඩ ටිකක්. ඒ කියන්නේ Model File එකකුයි Migration File එකකුයි හදා ගන්න එක. ඒකට මේ විදියට කරගෙන යන්න.
මුලින්ම Empty Migration File එකකයි Model File එකකයි හදාගෙන ඒක Edit කරගමු. ඒකට Command Prompt එකෙන් අපි හදා ගත්ත අලුත් Project Folder එක ඇතුලට ගිහින් මේ Command එක Type කරන්න.
php artisan make:model student -m
මේක run වුණාට පස්සේ බලා ගන්න පුළුවන් අලුතින් create_students_table.php file එකක් migration folder එක ඇතුලෙ හැදිලා තියෙනවා. App folder එක ඇතුලෙත් අලුතින් student.php file එකක් හැදිලා තියෙනවා. හරි දැන් මේ file 2 edit කරගමු.
මුලින්ම Migration File එක edit කරගන්න විදිය බලමු.
මම මේ Tutorial එකට පාවිච්චි කරන්නේ Student ලාගේ පොඩි Details ටිකක් තියා ගන්න පුළුවන් Table එකක්. Fields ටික FirstName, LastName, Address, Telephone කියන ඒවා. ඒවාට හරියන්න තමයි මම මේ Migration File එක හදා ගන්නේ.
create_students_table.php
<?php
use Illuminate\Support\Facades\Schema;
use Illuminate\Database\Schema\Blueprint;
use Illuminate\Database\Migrations\Migration;

class CreateStudentsTable extends Migration {
/**
* Run the migrations.
*
* @return void
*/
public function up()
{
Schema::create('students', function (Blueprint $table) { $table->increments('id');
            $table->string('firstname');
            $table->string('lastname');
            $table->string('address');
            $table->string('tp');
        });
    }

    /**
     * Reverse the migrations.
     *
     * @return void
     */
    public function down()
    {
        Schema::dropIfExists('students');
    }
}
මේ එකින් එක $table->string(‘firstname’); වගේ දීලා තියෙන්නේ අපිට Table එකේ හදා ගන්න ඕන කරන Fields ටික.
මේ විදියට Code එක ලියාගත්තට පස්සේ මේ Script එක Database Server එකේ run කරවන්න ඕන. ඒකට මේ migrate command එක use කරන්න පුළුවන් මේ විදියට.
php artisan migrate
දැන් ඔයාලට phpmyadmin වලින් අලුතින් හදපු Database එක බැලුවොත් පෙනෙයි අලුත් Table 2ක් හැදිලා තියෙනවා. (migration table එකෙන් වෙන දේ ගැන කලින් ලිපි වලින් කතා කලා)
හරි දැන් බලමු Model File එක හදා ගන්නේ කොහොමද කියලා. ඒක මේ විදියට Code කරගන්න.
<?php

namespace App;

use Illuminate\Database\Eloquent\Model;

class student extends Model
{
    protected $fillable = ['firstname', 'lastname','address','tp'];
}
මේ පියවරේ වැඩ ටික මෙතනින් ඉවරයි. දැන් අපිට ඉතිරි වෙලා තියෙන්නේ Views ටිකයි Controller එකකුයි හදා ගන්න.
තුන්වෙනි පියවර
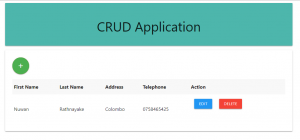
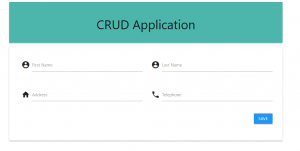
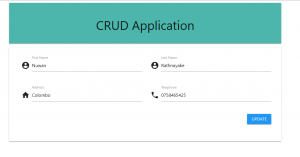
මේකෙදි අපි කරන්නේ අපිට අවශ්ය Views ටික හදා ගන්න එක. නිකන් Html Code ලියන හින්දා පැහැදිලි කරන්න ඕන නැති වෙයි කියලා හිතනවා. ඒක හින්දා View ටිකේ Code ටික දාගෙන යන්නම්. මේ ටික resourses/views folder එකේ Save කරගන්න.
index.blade.php
<html>
<head>
<title>CRUD Application</title>

<link rel="stylesheet" href="https://cdnjs.cloudflare.com/ajax/libs/materialize/1.0.0-rc.2/css/materialize.min.css">
<link href="https://fonts.googleapis.com/icon?family=Material+Icons" rel="stylesheet">
</head>
<body>
<div class="container">
<div class = "card-panel teal lighten-2"><h3 style="text-align: center">CRUD Application</h3></div>


<div class = "card-panel center">
<div style="float: left">
<a class="btn-floating btn-large waves-effect waves-light red" href="{{url('student/create')}}"><i class="material-icons float-left green">add</i></a>
</div>
<br>
<table class="striped" style="margin-top: 50px">
<tr>
<th>First Name</th>
<th>Last Name</th>
<th>Address</th>
<th>Telephone</th>
<th>Action</th>
</tr>
@foreach($students as $student)
<tr>
<td>{{ $student->firstname }}</td>
<td>{{ $student->lastname }}</td>
<td>{{ $student->address }}</td>
<td>{{ $student->tp }}</td>
<td>
<div class="row"><div class="col">
<a href="{{url('student/'.$student->id.'/edit')}}"><button class="btn btn-small blue">Edit</button></a>
</div>
<div class="col">
<form method="POST" action="{{route('student.destroy',$student->id)}}">
@csrf
@method('DELETE')
<button type="submit" class="btn btn-small red">Delete</button>
</form>
</div>
</div>
</td>
</tr>
@endforeach
</tabel>
</div>
</div>
<script src="https://cdnjs.cloudflare.com/ajax/libs/materialize/1.0.0-rc.2/js/materialize.min.js"></script>
</body>
</html>
add.blade.php
<html>
    <head>
        <title>CRUD Application</title>

        <link rel="stylesheet" href="https://cdnjs.cloudflare.com/ajax/libs/materialize/1.0.0-rc.2/css/materialize.min.css">
        <link href="https://fonts.googleapis.com/icon?family=Material+Icons" rel="stylesheet">
    </head>
    <body>
        <div class="container">
        <div class = "card-panel teal lighten-2"><h3 style="text-align: center">CRUD Application</h3></div>


        <div class = "card-panel center">
              <div class="row">
                <form class="col s12" method="POST" action="{{url('/student')}}">
                    @csrf
                  <div class="row">
                    <div class="input-field col s6">
                      <i class="material-icons prefix">account_circle</i>
                      <input id="firstname" type="text" class="validate" name="firstname">
                      <label for="firstname">First Name</label>
                    </div>
                    <div class="input-field col s6">
                      <i class="material-icons prefix">account_circle</i>
                      <input id="lastname" type="tel" class="validate" name="lastname">
                      <label for="lastname">Last Name</label>
                    </div>
                  </div>
                  <div class="row">
                    <div class="input-field col s6">
                      <i class="material-icons prefix">home</i>
                      <input id="address" type="text" class="validate" name="address">
                      <label for="address">Address</label>
                    </div>
                    <div class="input-field col s6">
                      <i class="material-icons prefix">phone</i>
                      <input id="telephone" type="tel" class="validate" name="tp">
                      <label for="telephone">Telephone</label>
                    </div>
                  </div>
                  <input type="submit" name="submit" class="btn blue right" value="Save">
                </form>
              </div>
        </div>
        </div>
    <script src="https://cdnjs.cloudflare.com/ajax/libs/materialize/1.0.0-rc.2/js/materialize.min.js"></script>
    </body>
</html>
edit.blade.php
<html>
    <head>
        <title>CRUD Application</title>

        <link rel="stylesheet" href="https://cdnjs.cloudflare.com/ajax/libs/materialize/1.0.0-rc.2/css/materialize.min.css">
        <link href="https://fonts.googleapis.com/icon?family=Material+Icons" rel="stylesheet">
    </head>
    <body>
        <div class="container">
        <div class = "card-panel teal lighten-2"><h3 style="text-align: center">CRUD Application</h3></div>


        <div class = "card-panel center">
              <div class="row">
                <form class="col s12" method="POST" action="{{ route('student.update',$student->id) }}">
                    @csrf
                    @method('PUT')
                  <div class="row">
                    <div class="input-field col s6">
                      <i class="material-icons prefix">account_circle</i>
                      <input id="firstname" type="text" class="validate" name="firstname" value="{{ $student->firstname }}">
                      <label for="firstname">First Name</label>
                    </div>
                    <div class="input-field col s6">
                      <i class="material-icons prefix">account_circle</i>
                      <input id="lastname" type="tel" class="validate" name="lastname" value="{{ $student->lastname }}">
                      <label for="lastname">Last Name</label>
                    </div>
                  </div>
                  <div class="row">
                    <div class="input-field col s6">
                      <i class="material-icons prefix">home</i>
                      <input id="address" type="text" class="validate" name="address" value="{{ $student->address }}">
                      <label for="address">Address</label>
                    </div>
                    <div class="input-field col s6">
                      <i class="material-icons prefix">phone</i>
                      <input id="telephone" type="tel" class="validate" name="tp" value="{{ $student->tp }}">
                      <label for="telephone">Telephone</label>
                    </div>
                  </div>
                  <input type="submit" name="submit" class="btn blue right" value="Update">
                </form>
              </div>
        </div>
        </div>
    <script src="https://cdnjs.cloudflare.com/ajax/libs/materialize/1.0.0-rc.2/js/materialize.min.js"></script>
    </body>
</html>
මේ Views ටික හරියට හදා ගත්ත නම් ඊළඟ පියවරට යන්න පුළුවන්…..
සිව්වන පියවර
මේ පියවරේදි අපි කරන්නේ Controller එකක් හදා ගන්න එක. ඒකට මේ Command එක command prompt එකේ run කර ගන්න.
php artisan make:controller studentController –resource
මේ Command එකෙන් වෙන්නේ අපිට Model එකක් Control කරන්න අවශ්ය වෙන Function එක්ක Controller එකක් හැදෙන එක. දැන් ඒ File එක open කරලා මේ විදියට code කරගන්න.
<?php

namespace App\Http\Controllers;

use Illuminate\Http\Request;
use App\student;

class studentController extends Controller
{
    /**
     * Display a listing of the resource.
     *
     * @return \Illuminate\Http\Response
     */
    public function index()
    {
        $students = student::all();
        // dd($students);
        return view('index',['students'=>$students]);
    }

    /**
     * Show the form for creating a new resource.
     *
     * @return \Illuminate\Http\Response
     */
    public function create()
    {
        return view('add');
    }

    /**
     * Store a newly created resource in storage.
     *
     * @param  \Illuminate\Http\Request  $request
     * @return \Illuminate\Http\Response
     */
    public function store(Request $request)
    {
        $studentnew = new student;
        $studentnew -> firstname = $request -> firstname;
        $studentnew -> lastname = $request -> lastname;
        $studentnew -> address = $request -> address;
        $studentnew -> tp = $request -> tp;
        $studentnew -> save();
        return redirect('student/create')->with('status','saved');
    }

    /**
     * Display the specified resource.
     *
     * @param  int  $id
     * @return \Illuminate\Http\Response
     */
    public function show($id)
    {
        //
    }

    /**
     * Show the form for editing the specified resource.
     *
     * @param  int  $id
     * @return \Illuminate\Http\Response
     */
    public function edit($id)
    {
        $studentfind = student::findOrFail($id);
        return view('edit',['student'=>$studentfind]);

    }

    /**
     * Update the specified resource in storage.
     *
     * @param  \Illuminate\Http\Request  $request
     * @param  int  $id
     * @return \Illuminate\Http\Response
     */
    public function update(Request $request, $id)
    {
        $studentfind = student::findOrFail($id);
        $studentfind -> firstname = $request -> firstname;
        $studentfind -> lastname = $request -> lastname;
        $studentfind -> address = $request -> address;
        $studentfind -> tp = $request -> tp;
        $studentfind -> save();
        return redirect('student/'.$studentfind->id.'/edit')->with('status','updated!');
    }

    /**
     * Remove the specified resource from storage.
     *
     * @param  int  $id
     * @return \Illuminate\Http\Response
     */
    public function destroy($id)
    {
        $studentfind = student::findOrFail($id);
        $studentfind -> delete();
        return redirect('/student');
    }
}
මේ File එකේ තියෙන $studentfind, $studentnew වගේ ඒවා තමන්ට කැමති Variables දාගන්න පුළුවන්…
පස්වෙනි පියවර
දැන් අපිට කරන්න ඉතිරි වෙලා තියෙන්නේ අන්තිම පියවර. ඒ කියන්නේ දැන් කරන්න ඕන Route ටික හරියට Config කරගන්න එක. ඒක අපිට කරන්න පුළුවන් Routes/web.php කියන File එක මේ විදියට Edit කරගෙන.
<?php

/*
|--------------------------------------------------------------------------
| Web Routes
|--------------------------------------------------------------------------
|
| Here is where you can register web routes for your application. These
| routes are loaded by the RouteServiceProvider within a group which
| contains the "web" middleware group. Now create something great!
|
*/

Route::get('/', function () {
    return view('welcome');
});
Route::resource('student','studentController');
මේ ටික ඉවරයි කියන්නේ අපේ Application එක run කරලා බලන්න පුළුවන් තත්වෙක දැන් තියෙනවා. Command Prompt එකේ මේ Command එක ගහලා Artisan Server එක on කරගෙන http://localhost:8000/student කියන link එක Browser එකේ Load කරගන්න.
php artisan serve
Add/ Edit/ Delete කරලා බලන්න. අවුලක් තිබුණොත් Comment එකක් දාන්න……
Complete Project Download From here: https://github.com/Danushka96/laravelcrud
2 Comments
Kushan Ravindu · September 20, 2018 at 10:24 am
Superb bro!!
Page not found - The SIGMA · September 11, 2018 at 1:15 am
[…] By Danushka Herath, 1 min ago September 11, 2018 […]